Katyanne has gone to a huge effort to provide thorough recipe instructions which I am sure will be appreciated.
To see more of Katyanne’s recipes check out her facebook page. [1]
Cake Ingredients:
200g butter, softened
1 cup caster sugar
3 large eggs
2 tsp vanilla extract
1 tsp vanilla bean paste
1 tsp lavender flavour (you can omit this for a delicious vanilla and raspberry cake)
1 cup milk
2 1/2 cups plain flour
1 1/2 tsp baking powder
¼ tsp baking soda
OPTIONAL: purple food colouring (gel colouring is preferred, though liquid is fine)
Ganache Ingredients:
250g raspberry white chocolate (I recommend whittakers) – you can also simply use plain white chocolate and add some sort of raspberry flavouring to it, such as GoBake Raspberry Flavacol
¾ cup cream + 1 tablespoon (around 195ml)
20g butter, cold from the fridge, cut into small pieces
Pink food colouring (gel is preferred, but if using liquid, add this to the cream before heating)
Buttercream Ingredients:
250g butter, softened
1/2 cup milk
1 kg icing sugar
2 teaspoons vanilla extract
1 teaspoon vanilla bean paste
Any remaining ganache
OPTIONAL: Pink food colouring (gel is preferred, though liquid is fine)
Steps:
- Infuse cream and make the ganache
- Bake the cake(s) and allow to cool completely (chill in fridge to make it easier to halve)
- Halve and fill the cake(s) with ganache
- Make the Buttercream
- Crumb coat the cake and chill for 15 minutes
- Ice the cake and decorate
The night before baking:
- Make the ganache. The easiest way to make this is by breaking up the chocolate into medium-sized pieces, putting them into a food processor, and processing them until they are small/fine pieces in size. Infuse the cream in the same way you infused the milk. While the cream is still hot, pour it over the processed chocolate, and allow to sit for around 10 seconds. Process the chocolate and cream together, and add the butter into the mixture. Process the mix until it is smooth and everything had combined. Pour into a shallow dish and allow to thicken in the fridge overnight, ready to be used.
To make the cake:
- Pre-heat oven to 150 degrees fan bake or 160 degrees bake, and prepare an 8” round cake tin by greasing and lining it.
- Cream the butter and the sugar.
- Add the eggs and mix to combine.
- Add the milk, vanilla extract, vanilla bean paste, purple food colouring, and the lavender flavour. Mix till all combined.
- Sift over the flour, baking powder, and baking soda. Using a spatula, partly mix these into the wet ingredients so there are no large patches of flour on the surface. Mix for around 10 seconds on a medium speed.
- At this stage, mix the batter slightly with a spatula to assess if more milk is required. The batter shouldn’t be hard to mix. Add more milk if necessary.
- Pour the batter in a lined and greased 8” round cake tin, and bake at 150 degrees on fan bake, or 160 on bake, for around 50 minutes, or until a skewer comes out cleanly and the top of the cake is golden in colour.
Makes one 8” round cake
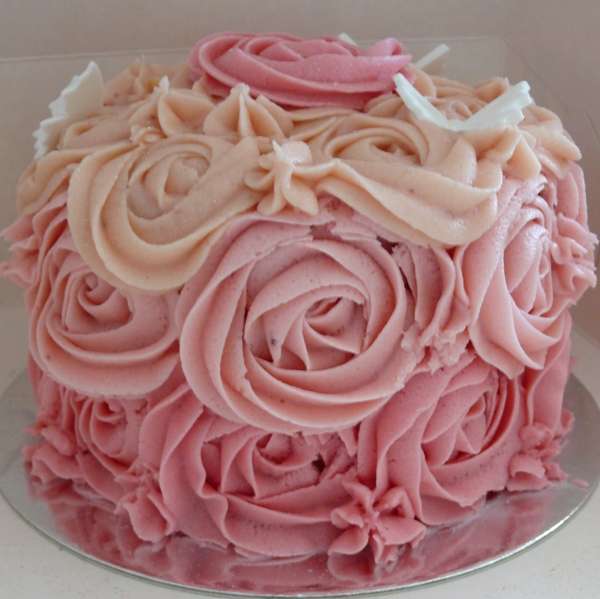
To make the cake in the photographs, I made two of these cakes, and cut each one in half. If you want to achieve the same look, you will need to make an additional ½ quantity of both the ganache and the buttercream- simply halve the current quantities and multiply by 3.
NB: if you are not confident about baking this cake, you can always use an Edmonds Vanilla Cake box mixture, add an extra egg, add 100g melted butter, and replace the water with milk.
For assembling the cake:
- Using a 10” round cake board, place little ganache right in the centre of the board, and place the first layer down onto the ganache – ideally this will go the cut side down onto the board, as the un-cut sides are easiest to top with ganache, which will help it stick to the board.
- Dollop about 1/4 of the ganache on to the top of the first layer and using a butter knife or an offset spatula (recommended), smooth the ganache around the top of the cake, taking it towards the outside edge of the cake. Don’t put too much on though, or you might not have enough. I used about ¼ of the ganache for each layer, and used the remaining ¼ for the buttercream. Top with the next layer of cake.
- Repeat with the remaining layers. Reserve on of the bottom halves for the top of the cake, as this will give you a nice flat and smooth surface to work with when you ice the cake.
- Place back into the fridge while you make the buttercream.
To make the Buttercream:
- Beat the butter for around 1 minute by itself on a medium speed. It should become pale and fluffy.
- Add the vanilla extract and vanilla bean paste, as well as any remaining ganache, mix to combine.
- If using the food colouring, start adding this in now
- While the mixture is beating on a low speed, gradually add in the icing sugar.
- Add the icing sugar until the mixture begins to look a little dry. At this point, add around a quarter of the milk (you may not need to use it all, so be wary).
- Continue to add in the icing sugar, adding small amounts of the milk while mixing.
- Once you have added all the icing sugar into the mixture, check the consistency of the buttercream. If it feels stiff to run a spoon through, then you will need to add more milk it, but if it is too runny, then you will need to add more icing sugar. Once it is a consistency you are happy with, beat the buttercream for another 2-3 minutes to make it really light and fluffy.
Crumb coating the cake:
- A crumb coat is a thin layer of buttercream that seals in any crumbs, and will give the piped roses something to adhere to.
- To do a crumb coat, place a large dollop of the buttercream onto the top of the cake in the centre, and using a butter knife or an offset spatula, move the buttercream towards the edge of the cake. It is best to put too much on at this part of the process (a lot of it will be coming off). You want to have it so that some of the buttercream is hanging over the edge of the cake.
- Using the buttercream that is hanging over the edge, using your knife or offset spatula, begin to draw this down the sides of cake. If you have any gaps or spaces around the side of the cake where there is no filling, etc. fill these spaces with buttercream. You want to obtain smooth sides.
- At this stage, be sure to make the buttercream layer as thin as possible, without having any cake exposed. This will also ‘seal in’ the cake, helping it to stay nice and moist.
- Chill in the fridge for 15minutes.
Icing the cake:
- Once the crumb coat has set, fill a piping bag, fitted with a Wilton 1M tip, with the buttercream. Fill till halfway to prevent overflow – you will have to refill it.
- NOTE: if you want to achieve an ombre effect as shown, first separate the buttercream into three bowls, tinting two into dark and darker shades of pink than the original colour. Place each colour into an individual piping bag. You can either use a coupler in each, and fit it with a 1M, fit each bag with an individual 1M, or fit a larger piping bag with a 1M tip and place the piping bag filled with the correct colour in this and change as required.
- Starting at the bottom of the cake, about an inch from the base, start piping your first rose. Start from the centre and work your way outwards (there are a number of good YouTube videos on how to achieve this affect. Continue along the bottom until the first row of roses is complete. If you feel like one of the roses doesn’t look right, simply scrape it off with a knife or offset spatula, putting the buttercream back in the bowl to re-use, and re-do it. Continue this process until the whole cake is covered in buttercream roses. If there are any gaps between the roses, use any remaining buttercream to pipe little stars (or rose buds as you could call them) to fill these gaps.
- Decorate as you like – I used edible glitter and fondant butterflies.
Method
Article printed from Recipes For Food Lovers Including Cooking Tips At Foodlovers.co.nz: https://www.foodlovers.co.nz